How to Use Nearby Sharing to Share Files in Windows 10

What is Nearby Sharing?
Nearby Sharing is a new feature in Windows 10 that allows you to share files with a nearby PC or laptop. To use this feature, it should be enabled on both PCs/laptops. Also, turn ON Bluetooth on both devices.
In this article, we’ll explain how to use this feature.
Related: How to Use Windows 10 Emoji Keyboard
Share Files Using ‘Nearby Sharing’ in Windows 10
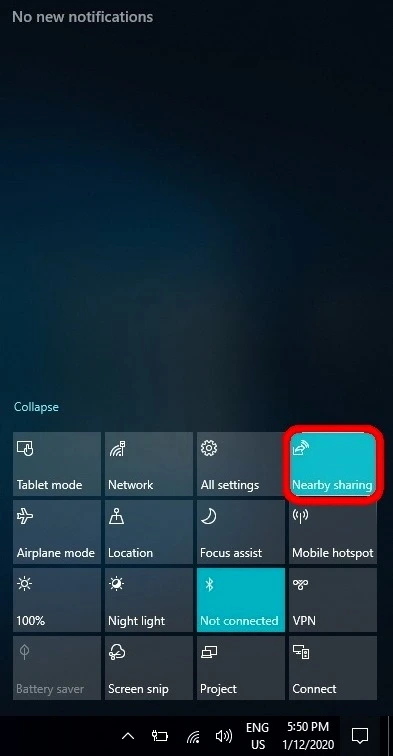
- To enable the Windows 10 Nearby Sharing feature, click on Notifications and enable Nearby Sharing on both the sending and receiving PC as shown in the picture.

- Select Share from the top menu and then select the file you want to share with a nearby PC.

- A new window will appear. Select the PC you want to share the file with. A notification will appear on the other PC asking to save the file. Click on Save to save the file immediately or select Save & Open to quickly save and open the file.
- The file will then be transferred to the other PC. This file-sharing process may take some time depending on the file size and Bluetooth connection speed.
Related: How to Increase Internet Speed in Windows 10
You can also quickly share a website or link in the Microsoft Edge browser through Windows 10 Nearby Sharing feature.
- From the Edge browser, open the website you want to share and then select the share button. On the share window, select the PC with which you want to share the link.

- On the receiving computer, a notification will appear. Select Open to view the website in Microsoft Edge.
The Photos app in Windows 10 also has the share button. You can open the photos and quickly share them with other PC using the Nearby Sharing feature.
Note: Does this article provide the info you’re looking for? Is there any information you think of missing? You can give your opinion in the comments section below.
If you like this tutorial, share this post and spread the knowledge by clicking on the social media options below because “Sharing is caring”


